Day 8:- Play the Nokia Tune Using an Arduino Buzzer
July 15, 2026
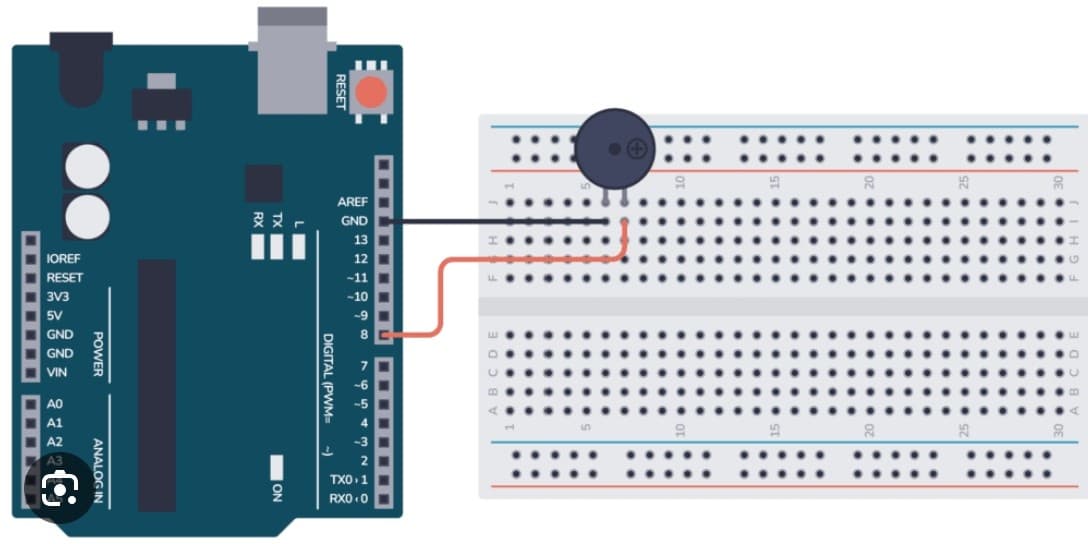
Wiring Schematic
Source Code
Arduino / C++
Day 8 Core Training Documentation
Project Overview
The Arduino Buzzer Nokia Tune project introduces one of the most exciting applications of microcontrollers: sound generation.
In this project, Arduino uses a passive buzzer to play the iconic Nokia ringtone by generating different sound frequencies. Instead of simply turning a buzzer ON or OFF, the Arduino precisely controls the frequency and duration of each note to produce a recognizable melody.
This project introduces:
Passive Buzzer
Sound Frequency Generation
The tone() Function
Musical Notes and Timing
Melody Programming
By completing this project, you'll understand how Arduino can generate sounds, play melodies, and interact with audio devices in embedded systems.
Connect the Arduino GND pin to the negative rail of the breadboard.
This creates a common ground connection for the circuit.
Step 2: Connect the Passive Buzzer
Place the passive buzzer onto the breadboard.
Connect:
Positive (+) Terminal → Arduino Pin 8
Negative (-) Terminal → Breadboard GND rail
Step 3: Verify Connections
Double-check the buzzer polarity before uploading the code.
Important: This project requires a Passive Buzzer. An Active Buzzer contains an internal oscillator and can only generate simple beeping sounds, while a passive buzzer can play melodies by varying the output frequency.
How the Arduino Code Works
Configure the Output Pin
Inside setup(), Arduino configures Pin 8 as an output pin.
This pin sends frequency signals to the passive buzzer.
Store the Melody
The Nokia ringtone is stored as two arrays:
One array stores the musical note frequencies.
The second array stores the duration of each note.
Generate Musical Notes
The tone() function generates sound by sending square-wave signals of different frequencies to the buzzer.
Each frequency corresponds to a different musical note.
Control Note Timing
The program uses delay() to determine how long each note should play before moving to the next one.
Repeat the Melody
After all notes have been played, the program waits for a short delay and then repeats the Nokia tune continuously.
Expected Output
After uploading the code:
The passive buzzer begins playing the classic Nokia ringtone.
Each note is played at the correct frequency and duration.
The melody pauses briefly before repeating continuously.
Operational Troubleshooting
No Sound: Verify that you are using a passive buzzer and check the wiring to Pin 8 and GND.
Incorrect Melody: Ensure the complete code has been uploaded without modifying the note or duration arrays.
Very Low Volume: Passive buzzers are naturally quiet. Move closer to the buzzer or use a small speaker module for louder sound.
Upload Errors: Verify the correct Arduino board and COM port are selected in the Arduino IDE.
What You Learned
By completing this project, you have learned:
How a passive buzzer works
How Arduino generates sound using the tone() function
How musical notes are represented by different frequencies
How note duration affects a melody
How to play a complete tune using Arduino
Next Lesson
In Day 9, you'll learn how to measure distance using an Ultrasonic Sensor (HC-SR04) and display accurate object detection with Arduino.