The ESP32-S3 OLED Anime Video Player project introduces an engaging application of embedded multimedia processing: high-framerate bitmap animation streaming on microcontrollers.
In this project, an ESP32-S3 microcontroller interfaces with an SSD1306 0.96" OLED display to render custom, high-contrast anime edit animations (such as Gojo Satoru or Sung Jin-woo synced to phonk/montagem beats). Instead of requiring external video decoders or complex media streaming pipelines, the ESP32-S3 utilizes its dual-core architecture and internal flash memory (PROGMEM) to rapidly cycle through pre-processed 1-bit monochrome bitmap frame arrays at a consistent 20–24 frames per second (FPS).
High-Contrast Display Optimization for Visual Storytelling
By completing this project, you'll understand how to convert standard digital video into memory-efficient microcontroller data, push high-speed frame buffers over I2C, and achieve fluid animations on compact embedded screens.
Design Note: Use the standard hardware I2C GPIO pins on the ESP32-S3 to ensure maximum bus stability and high-speed data transmission.
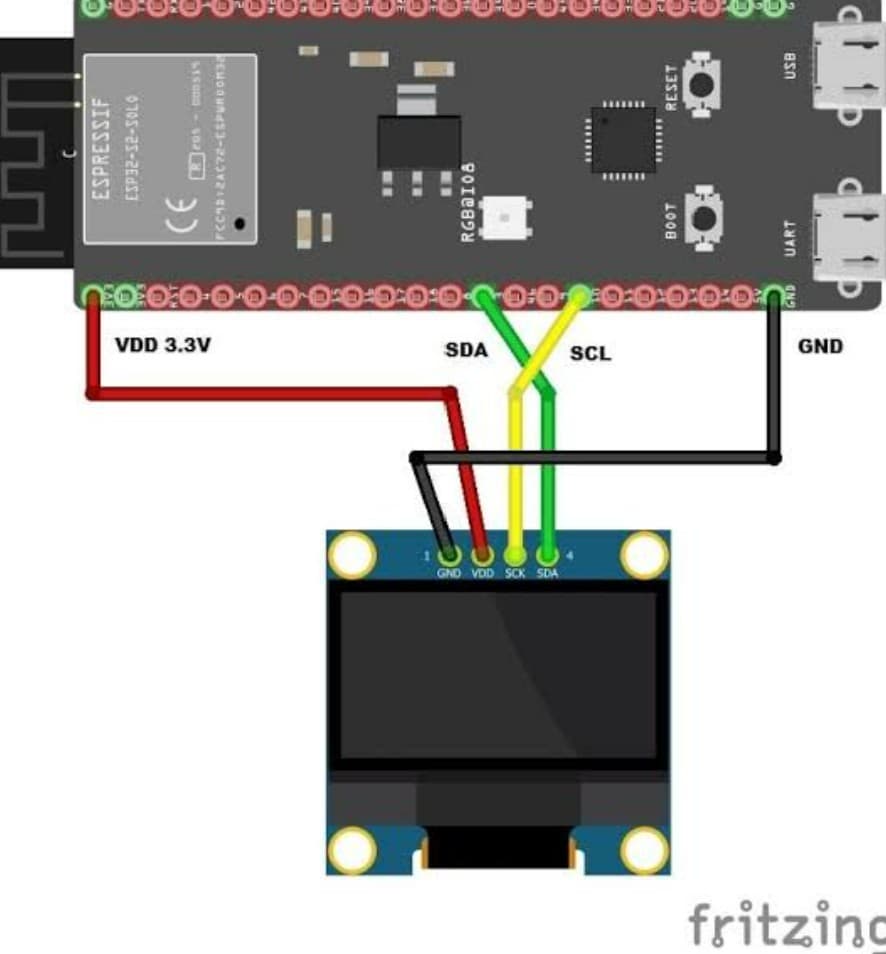
Connect the 4-Pin I2C OLED Display
Connect the OLED display to the ESP32-S3 development board:
VCC → ESP32-S3 3V3(or 5V if using a module with a built-in 3.3V LDO regulator)
GND → ESP32-S3 GND
SDA → ESP32-S3 GPIO 8
SCL → ESP32-S3 GPIO 9
How the ESP32-S3 Code Works
Initialize I2C Bus & Fast-Clock Mode
Inside setup(), the ESP32-S3 initializes the I2C interface on GPIO 8 (SDA) and GPIO 9 (SCL). The clock frequency is explicitly set to 400000 (400 kHz) to increase the data transmission rate, minimizing screen-tearing and enabling smooth playback.
Allocate and Reference Bitmap Frames
All video frames are stored as const unsigned char byte arrays inside frames.h using the PROGMEM keyword. This directs the compiler to store the image data directly in the ESP32-S3's internal flash memory rather than consuming precious runtime SRAM.
Render Frames Sequentially
Inside loop(), a pointer array cycles through each bitmap frame. The code executes:
display.clearDisplay() to wipe the previous frame buffer.
display.drawBitmap(0, 0, frameData, 128, 64, WHITE) to unpack the 1-bit pixel stream into the display buffer.
display.display() to push the complete screen buffer over the I2C bus.
delay(FRAME_DELAY) to enforce a stable frame rate matching the source animation.
Expected Output
After uploading the code and powering the ESP32-S3:
The SSD1306 OLED screen initializes cleanly with no visual artifacts or static.
The display immediately begins playing the high-contrast anime edit loop at 20–24 FPS.
White character outlines, slashes, and eye-glow animations light up against a true-black OLED background with zero stutter.
The sequence loops continuously and seamlessly.
Operational Troubleshooting
Display Not Powering On / Blank Screen: Verify that the I2C address is set to 0x3C in the code and confirm that VCC is connected to 3V3 with GND firmly grounded.
Animation Plays Too Slow / Stuttering: Ensure Wire.setClock(400000); is present in setup(). If playback is still slow, lower the frame rate to 20 FPS or reduce total frame count.
Visual Artifacts or Distorted Graphics: Double-check that all extracted PNG frames and the canvas size in image2cpp were strictly set to 128 width by 64 height before generating the array.
Compilation Error: "Sketch too big / Flash overflow": Reduce the duration of the animation clip (target 3–4 seconds) or slightly lower the FPS so the total frame array fits within the partition scheme of your ESP32-S3.
What You Learned
By completing this project, you have learned:
How to downscale, crop, and convert standard MP4/GIF video files into 1-bit monochrome bitmap arrays
How to store large binary graphic assets in microcontroller flash memory using PROGMEM
How to configure ESP32-S3 custom I2C pins and increase the I2C clock speed for high-framerate rendering
How to construct a lightweight, high-performance animation engine on embedded hardware without operating systems
Next Lesson
In the next project, you'll learn how to interface a DFPlayer Mini audio module or use the ESP32-S3 I2S DAC to play synchronized background audio tracks directly alongside the OLED video playback.