The ESP32 Smart Attendance System project introduces one of the most practical and popular applications of Internet of Things (IoT) technology: wireless contactless identification and local data logging.
In this project, an ESP32 microcontroller interfaces with an RC522 RFID reader to scan student ID cards, process unique card identifiers (UIDs), and provide instant audiovisual feedback. Instead of relying on third-party cloud platforms or external home Wi-Fi, the ESP32 acts as a standalone Wi-Fi Access Point and local Web Server, hosting a live, interactive web dashboard directly on your local network.
This project introduces:
MFRC522 RFID Module Interfacing (SPI Protocol)
I2C 16x2 Character LCD Control
ESP32 SoftAP (Access Point Mode)
Local Web Server Hosting (WebServer.h)
Asynchronous Web Dashboards (JavaScript Fetch API / JSON)
Card UID Authentication & Logging
By completing this project, you'll understand how microcontrollers authenticate physical cards, communicate over SPI and I2C buses, and host independent web dashboards without needing an internet connection.
Hardware Required
ESP32
Components Required
ESP32 DevKit V1 (30-Pin) × 1
RC522 RFID Module with RFID Cards/Tags × 1
16x2 LCD Display with I2C Backpack × 1
Active 5V/3.3V Buzzer × 1
5mm Green LED × 1
5mm Red LED × 1
220Ω Resistors × 2
Breadboard × 1
Jumper Wires × 1 Set
Micro-USB Cable × 1
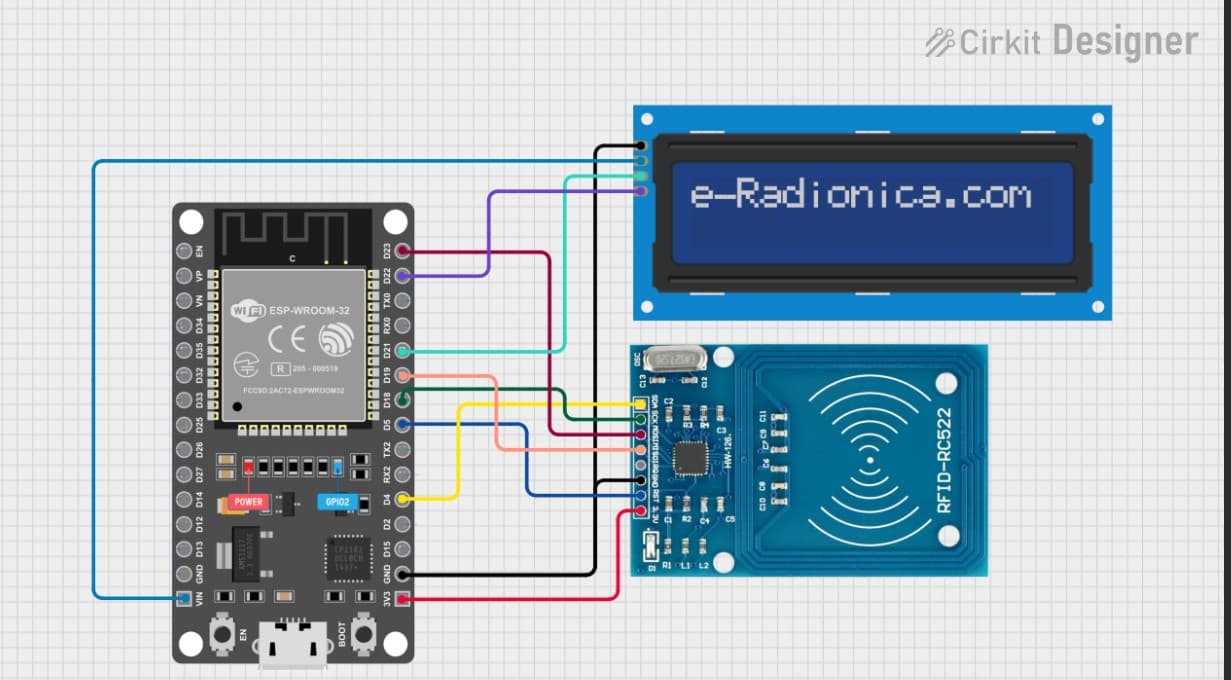
Circuit Connections
Design Note: All connections are organized strictly along the Right Rail of the 30-pin ESP32 to maintain a neat layout for prototyping and filming.
Step 1: Connect the RC522 RFID Module (SPI Bus)
Connect the RFID-RC522 module to the ESP32 SPI hardware pins:
3.3V (VCC) → ESP32 3V3(Important: Do NOT connect to 5V)
Green LED (+) → ESP32 GPIO 16 (RX2) via 220Ω resistor | (-) → GND Rail
Red LED (+) → ESP32 GPIO 2 (D2) via 220Ω resistor | (-) → GND Rail
How the ESP32 Code Works
Configure Access Point & Web Server
Inside setup(), the ESP32 creates a local private Wi-Fi network (ESP32_Attendance) using WiFi.softAP(). It launches an internal HTTP server on port 80 to serve the HTML dashboard stored in index.h.
Read & Validate Card UIDs
When an RFID card approaches the reader, the MFRC522 library reads its 4-byte UID over the SPI bus. The code compares this UID against registered student identifiers in memory.
Provide Real-Time Hardware Feedback
If the card matches an authorized student, the ESP32 turns ON the Green LED, triggers a short confirmation beep on the buzzer, and displays the student's name on the LCD.
If the card is unrecognized, the Red LED lights up, an error tone sounds, and the screen displays "Access Denied".
Update the Local Web Dashboard
The validated record (Name, UID, Status, and Timestamp) is saved to an internal data array. Connected client browsers fetch this data asynchronously every second via the /getData JSON endpoint, automatically updating the web table without reloading the page.
Expected Output
After uploading the code and powering the ESP32:
The LCD initializes and displays: Smart Attendance / Tap ID Card...
The ESP32 broadcasts a Wi-Fi network named ESP32_Attendance.
Connecting your laptop to this network and navigating to http://192.168.4.1 opens the live attendance dashboard.
Tapping a registered ID card immediately flashes the green LED, beeps the buzzer, updates the LCD, and inserts a new student record into the laptop's web browser in real time.
Operational Troubleshooting
LCD Display Blank or Faded: Connect LCD VCC to VIN instead of 3V3, and adjust the blue contrast potentiometer on the back of the I2C backpack using a screwdriver.
RFID Card Not Detected: Verify that the RC522 is powered with 3.3V (not 5V) and ensure the SPI pins (D5, D18, D19, D23, D4) are seated firmly.
Web Dashboard Not Loading: Ensure your laptop or phone is connected to the ESP32_Attendance Wi-Fi network before opening http://192.168.4.1 in your browser.
Compiler Access Denied Error: Close background Arduino tasks in Task Manager, add an antivirus folder exclusion for the Arduino directory, and run the Arduino IDE as Administrator.
What You Learned
By completing this project, you have learned:
How the RC522 RFID reader reads 13.56 MHz card UIDs over SPI
How to interface I2C character displays with an ESP32
How to configure the ESP32 as an independent Wi-Fi Access Point (SoftAP)
How to host embedded HTML/CSS/JS web pages directly from microcontroller flash memory
How to build real-time IoT hardware-to-browser logging systems without cloud dependencies
Next Lesson
In the next project, you'll learn how to build an IoT Environmental Monitor using a gas sensor, Bluetooth Low Energy (BLE), and a custom web dashboard.